
Created on the iPad using a Wacom Bamboo stylus and the Brushes 3 app.
Before you begin, you will need to have downloaded the extra layers for Brushes, available as an in-app purchase.

Create a new image by tapping '+' in the top right corner of the menu screen. Then tap 'Create'.

Tap the coloured tablet in the bottom left corner of the next screen and select a bright red. Check the position of the three little circles as shown.

Tap the cog on the bottom right of the screen. Then tap 'Fill Layer'.

Red!

Tap the little '1' in the bottom right corner of the screen, then tap '+' as shown. This adds another layer to your image.

Now tap the coloured tablet again (bottom left - it should be red!) and this time, select a bright yellow.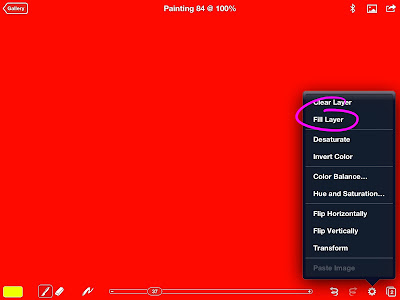

Tap the cog again, then tap 'Fill Layer'.

Here, on the layer menu you can see the two layers you have created. On the main screen, however, because the yellow layer is at 100% opacity, you cannot see the red layer beneath it. Move the slider (circled) to 50% and the screen should go...

...orange!
Select the eraser (3rd icon from the left along the bottom), then tap on the brush-shape icon, immediately to its right. Next, select any brush and tap on the arrow to its right to edit it.

You are now in brush edit mode and the top of the menu has changed from 'Brushes' to 'Brush'. Select the first brush-shape in the row and set all the sliders as shown.

Tap and drag to see all the settings for the brush you're editing, then set the brush-size slider to maximum.

Re-size your image by pinching the screen with two fingers. By working on a smaller image, you can make longer strokes with shorter movements!

Now sweep backwards and forwards over the screen...

Sunset!
Pinch and drag with two fingers to restore the image to 100%.
For your PDF copy of the complete tutorial, please visit www.davidchandler.net/shop.html.
No comments:
Post a Comment