Friday 15 March 2013

iPad Art Step-By-Step: A Tuscan Chapel (Part 2: Hills)

Continuing from my previous post when we created the glowing orange background to this little, Tuscan cliché.
 Tap on the Layers icon. This should be a little '2' in the bottom right corner. Add a new layer by tapping '+' in the top right corner of the new pop-up window.
Now select black by tapping on the tablet in the bottom left corner.
Now, let's edit another brush. Here are the settings you'll need (click on this image to enlarge).

Draw your hill using a big, wide brush (about 330). You can edit the shape with the eraser (80) and don't forget, there's always the undo function!
Tap the cog, then 'Transform' and with one finger, move your hill into place. Using two fingers will re-size it.
Duplicate your hill, by tapping the icon to the left of '+' in the pop-up, Layers window.
Tap the cog again and select 'Flip Horizontal' from the menu.
Tap the cog yet again and this time, select 'Transform' to move and resize your hill.
Tap the Layers icon, adjust the transparency of each layer with the slider and merge the layers by tapping on the twisty arrow. The Brushes app has a limit of ten layers, so it's a good idea to merge them occasionally. Make sure, however, that you are merging the correct layer by checking which one is highlighted in blue-grey. Make certain also, that you no longer want to edit the layers you're about to merge or you'll be hammering that Undo icon!
Duplicate your merged layer and adjust its transparency by dragging the slider in the Layers menu.
Transform and/or flip it by tapping the cog.
Add a road by erasing a section of the first layer of hills. It's easier to do this before you merge them, but if like me, you've gone too far, by pinching and dragging with two fingers, you can zoom in for some fairly precise work.

For your PDF copy of the complete tutorial, please visit www.davidchandler.net/shop.html.


iPad Art Step-By-Step: A Tuscan Chapel (Part 1: Sunset)

Created on the iPad using a Wacom Bamboo stylus and the Brushes 3 app.
Before you begin, you will need to have downloaded the extra layers for Brushes, available as an in-app purchase.
Create a new image by tapping '+' in the top right corner of the menu screen. Then tap 'Create'.
Tap the coloured tablet in the bottom left corner of the next screen and select a bright red. Check the position of the three little circles as shown.

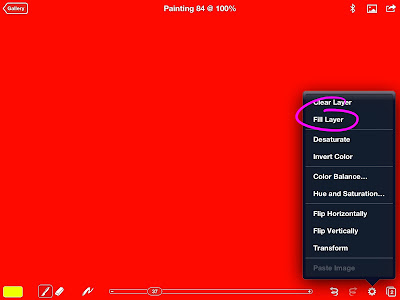
Tap the cog on the bottom right of the screen. Then tap 'Fill Layer'.

Red!
Tap the little '1' in the bottom right corner of the screen, then tap '+' as shown. This adds another layer to your image.
Now tap the coloured tablet again (bottom left - it should be red!) and this time, select a bright yellow.
Tap the cog again, then tap 'Fill Layer'.
Here, on the layer menu you can see the two layers you have created. On the main screen, however, because the yellow layer is at 100% opacity, you cannot see the red layer beneath it. Move the slider (circled) to 50% and the screen should go...
...orange! 
Select the eraser (3rd icon from the left along the bottom), then tap on the brush-shape icon, immediately to its right. Next, select any brush and tap on the arrow to its right to edit it.
You are now in brush edit mode and the top of the menu has changed from 'Brushes' to 'Brush'. Select  the first brush-shape in the row and set all the sliders as shown.
Tap and drag to see all the settings for the brush you're editing, then set the brush-size slider to maximum.

Re-size your image by pinching the screen with two fingers. By working on a smaller image, you can make longer strokes with shorter movements!
 Now sweep backwards and forwards over the screen...
Sunset!
Pinch and drag with two fingers to restore the image to 100%.

For your PDF copy of the complete tutorial, please visit www.davidchandler.net/shop.html.